Ingredients
- Butter: 170g, melted
OR
- Flavorless Oil: 150g (about 170ml), such as sunflower, canola, or vegetable oil
- White Caster Sugar: 300g
- Large Eggs: 3, preferably at room temperature
- Vanilla Extract: 1 tsp
- Unsweetened Cocoa Powder: 65g
- All-Purpose Flour: 110g
- Instant Coffee Powder: ½ tsp
- Optional Decoration: 100g milk chocolate, 1 tbsp flavorless oil, and almond slices as needed
Instructions
Step 1 : Mix the cocoa & coffee
- If using butter, gently melt 170g butter and remove it from the heat. Add the cocoa powder and instant coffee powder, then whisk until smooth. Let the mixture cool slightly. If using oil, simply mix the oil, cocoa powder, and coffee powder together.
Step 2 : Mix the eggs & sugar
- Next, add the room-temperature eggs, caster sugar, and vanilla extract to a large mixing bowl. Whisk until everything is well combined and smooth.
Step 3 : Beat the egg mixture
- Using a hand mixer on low speed, beat the egg and sugar mixture for 5–8 minutes. It should become lighter in color, slightly thick, and glossy. The sugar should also be mostly dissolved. This helps create a smooth texture in the cocoa brownies.
Step 4 : Add the cocoa mixture
- Slowly pour the cooled cocoa mixture into the egg mixture. Beat on low speed until everything is well combined. The brownie batter should look smooth and have an even chocolate color.
Step 5 : Add the flour
- Add 110 g all-purpose flour to the bowl. Gently whisk the flour into the batter by hand until no dry flour remains. Be careful not to overmix, as this can make the brownies less fudgy.
Step 6 : Give the batter a final mix
- Use a rubber spatula to scrape the bottom and sides of the bowl. Then, gently mix the batter one final time to make sure all the ingredients are evenly combined.
Step 7 : Bake the cocoa brownies
- Preheat the oven to 170°C. Meanwhile, line a 9-inch square baking pan with parchment paper, leaving some paper hanging over the sides for easy removal.
- Pour the brownie batter into the prepared pan and spread it evenly into the corners. Bake at 170°C for 20–25 minutes. The edges should look set, while the center should still be slightly soft.
Step 8 : Cool before slicing
- Allow the brownies to cool completely in the pan before cutting. As they cool, the fudgy center will set properly. This also helps you get clean, neat slices without the brownies falling apart.
Step 9 : Add the optional topping
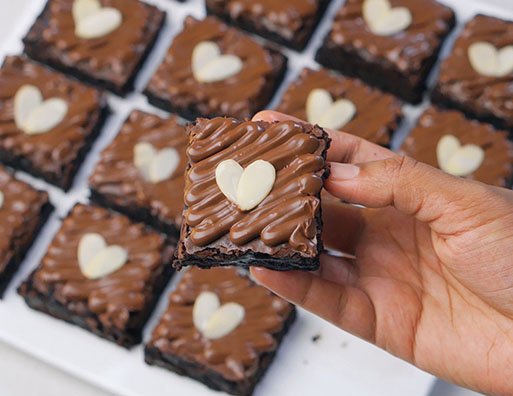
- For the topping, melt 100g milk chocolate and mix in 1 tablespoon of flavorless oil until smooth. Drizzle the chocolate over the cooled cocoa brownies. Finally, decorate with almond slices, placing two slices together to create small heart shapes.
Notes
Storage and Make-Ahead Tips
1)At room temperature: Once the brownies have cooled completely, store them in an airtight container in a cool place. For the best texture and quality, enjoy them within 3–4 days.
2)In the refrigerator: If your kitchen is very warm or you’ve added a perishable topping, store the brownies in an airtight container in the refrigerator. Let them sit at room temperature briefly before serving if you prefer a softer texture.
3)In the freezer: Wrap individual brownie squares tightly and place them in a freezer-safe container. Freeze for up to 2 months for best quality. Thaw before serving.
4)Making them ahead: Bake the brownies the day before you need them. Once cooled, cover them and let them rest overnight. This also makes them easier to slice neatly.
5)Storing decorated brownies: Allow the melted chocolate topping to set before placing the brownies in a container. Separate layers with parchment paper to prevent them from sticking together.
- Prep Time: 15 mins
- Cook Time: 20-25 mins
- Category: Dessert
- Method: Baking